Tag Archives: schleich

Second Show Donation, Finished!

Hurrah! My donation for the Rose City Live Show (Sept 8) is done. This is Mowgli, a minimal sabino pony:

This slideshow requires JavaScript.

Dots and Spots

I finally got some paint out yesterday and put some color on two of my prepped horses. It was really fun to have a brush in hand again!

This spotty fellow is a commission/trade. He is an absolute blast to paint.

Here he has one layer in acrylics and one in black pastel. Next I’ll start working on making his white a more realistic off-white horse color instead of the stark hue of the primer. That will dull down and “push back” a lot of the spots and roaning I’ve put on in the first layer, but hopefully that will give a nice depth to his color. And I’ll go back in nearer the end and darken the spots and reroan as desired. Working on his little hairs makes me really eager for my upcoming strawberry roan.

This guy is looking a little scary at the moment, but that strange mane and tail was just to give me something to see instead of white as I paint his body color in.

Many people, myself included, will do a pinto by finishing a complete solid paint job and then layering the white markings over. In this case, because the horse has so much white (his other side is nearly completely white) I’m only pastelling the chestnut color into the specific places I marked out in acrylic. That way I won’t be wasting time, energy, or materials on a bunch of coloring and shading that will just be painted over.

I used a really light layer of a base color to mark the spots (it’s much lighter in person) so that it will barely influence the final color more than plain white. After the spots are their finished color, I’ll redo his white in a nice off white horse color and add the appropriate shading. I hope he’ll end up as cute as my reference pictures!

Splitting a Schleich in Half

…is honestly a big pain in the butt, and a task I won’t be repeating if I can help it. But if you really must know, here’s how I did it.

Unlike Breyer and Peter Stone horses, which are made of hard plastic and hollow, Schleich horses (and similar brands) are made of a softer, more rubbery plastic, and they are solid. This makes is much harder to cut through them, because there is way more material to go through.

If you have a Jigsaw you should just skip all this and head to the tool box. But I only have a dremel, so that’s what I used.

The first thing I tried was using an abrasive metal brush tool to strip away plastic where I wanted the model to split. The brush is not very big, however, so although it works well against the rubbery plastic I could only make about a quarter inch dent into the horse.

I needed to somehow get rid of and/or weaken the plastic still firmly holding the middle of the horse together. So I got out a cutting bit…

and starting drilling holes through the remaining plastic (a straight up drill bit would work for this as well).

After drilling a bunch of holes all the way through the remaining plastic, it was weakened enough to pull apart.

You can see the “star” where I drilled through the middle:

The second model, for whatever reason, needed quite a few more holes drilled, but finally he too was able to be pulled apart.

I’m just glad that part of the Sleipnir project is over with and I’m on to the fun stuff now!

The beginnings of Sleipnir

When my dear friend Sarah asked me to make her a model of the eight-legged stallion of Norse mythology, Sleipnir, I couldn’t help but say yes. Even though it’s a completely insane project and I have quite a few others I’m in the middle of- or would like to start. But I couldn’t resist.

Traditional references aren’t as applicable for an eight legged horse, but we found lots of very cool Sleipnir art on Deviantart to inspire us and aid in the brainstorming (including this amazing skeleton). From there I made a series of sketches until we were both happy with the plan:

It took me a couple of weeks to get both of the bodies I needed (Schleich’s Andalusian Stallion and Haflinger Mare) and I was very eager to begin. Alas, cutting a Schleich in half is a huge pain and I burnt out my dremel before I finished both.

Now, with new dremel in hand, I’ve been using every spare moment to work on this wacky, fun project. Check it out!

The unsuspecting victims

Plotting the carnage

Ouch!

Starting to come together… sort of…

Pinning the pieces – you definitely want at least two big wire pins to hold together something this large

Assembly progress: 6/8

All legs attached and lookin’ fine!

Next up: tons and tons of sculpting. But it’s super satisfying just to have him at this stage. Now I think I can calm down and spend time with all the projects. Sometimes you just need to scratch a certain itch.

Adventures of a First Time Stripper

Is there any blogger who can resist a racy title when talking about stripping paint off model horses? I obviously cannot.

Before this recent foray, I had never needed to strip off a previous paint job from one of my bodies. I was usually working from an original finish horse, and the few times I wasn’t I just sanded down the original paint job until it was smooth enough to re-prime.

But I recently found myself with three models in need of stripping: a Breyer SM with a thick lumpy acrylic coat, a multi-media Schleich with layers in acrylic, pastel, and modge-podge, and a resin with a mediocre acrylic paint job. So I finally started paying attention to all the discussions of technique.

After a little research, I decided to try to Oven Cleaner technique. And of course, to chronicle my trials here for whoever else might want to give it a go!

To strip a horse using oven cleaner, simply stick the horse in a bag, spray liberally with oven cleaner (I used the recommended brand Easy Off) and wait. After an hour or so, remove the horse and scrub with a toothbrush under warm water. Repeat until clean and add time in the bag as needed.

Tools of the trade

WARNING: Oven cleaner is made of nasty chemicals. It is smelly and if you get it in a cut it will burn. Avoid inhaling it, getting it on your hands, etc. Keep away from children and pets, and wash your hands!

First Victim: Breyer Stablemate

This guy was easy to strip. His acrylic coat was so thick it was begging to come off, and after only about an hour in the oven cleaner he was ready to go under the sink.

I barely needed the toothbrush- the power of the oven cleaner and the pressure of the running water did most of the work. I used the tooth brush in the crevices, but my model was soon restored to near OF condition:

Victim Two: Schleich Pony

I was a little bit worried that the oven cleaner would eat away at the soft rubbery plastic of a Schleich horse, so I didn’t leave him long in the bag the first time.

He was soon back in the chemical bath, however, because even with some serious scrubbing this is all the progress I made at first:
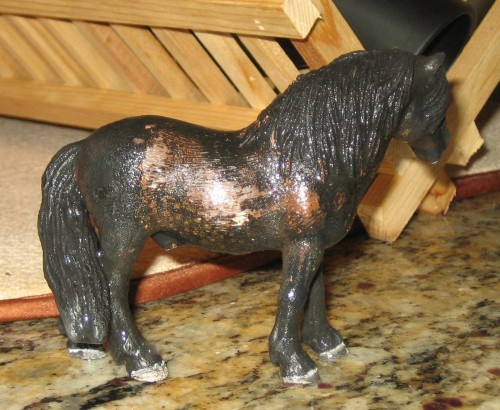
I got a little braver and left him in for longer, reminding myself that if I’m gonna ruin a body it might as well be a cheap one that I have no specific plans for. It ended up taking quite a while to get him relatively clean- I estimate that he spent 5-8 hours in his chemical bag total. I don’t know if the issue was his modge-podge sealer, or the multi-media coat, or what.

He didn’t clean up quite as well as the Stablemate, but certainly well enough to reprime and repaint. I stopped using the oven cleaner on him when I noticed that I was actually stripping of his original finish paint. But the plastic itself seems fine, with no evidence of the melting or warping that acetone can cause.

Ready for a new identity!

Victim Three: Resin Stablemate

At first the paint job on my newly acquired “Roll” resin seemed nice and smooth, and I considered sanding and painting him over without a full strip. But upon closer examination I saw that the thick acrylic on him was obscuring some of his detail, particularly in his feathering. So into the oven cleaner he went!

His first foray yielded promising results:

Besides the toothbrush, I found my fingernails to be useful tools.

Although the main areas of paint came off easily in big pieces, he needed a lot more chemical therapy to get down to primer and into detail areas. Even when I declared him stripped (after maybe 8 hours total in chemicals, and multiple scrubbings) he still had some residual paint and primer in cracks and crevices, which I’ll just have to get in the prepping stage.

But happily, he’s now much cleaner and ready to start his next adventure. And to my great relief, I don’t seem any damage at all to the resin from all the chemicals. Despite assurances from other hobbyists, I had worried.

Overall, I’m pretty pleased with my new technique. It’s definitely nice to start afresh, and the oven cleaner makes it pretty painless, albeit somewhat time consuming. The price was right, too- Easy Off ran me about $6, and the can is still pretty full even after all the liberal spraying on these three horses.

Next time I think I’ll be braver with the soaking times, and invest a few dollars in a hard-bristled toothbrush to use instead of the soft used ones I have.